Create new Advanced Agent
This application type is an agent-based application. With this type, you can connect your application to multiple sources using our tools, or operate without any connections. The smart agent intelligently determines which tool to use for each task. If you need to conduct complex operations, this is the application type for you!
This step-by-step guide will walk you through the process of creating a chat application and seamlessly embedding it directly into your platform.
Building Smarter LLMs: Leverage the ReAct Framework
SUPERWISE® integration of the ReAct framework provides a robust method for enhancing LLMs by equipping them with a rich context and an array of tools for advanced reasoning. This flexible approach allows models to be configured with specific external resources and data, vastly improving their decision-making capabilities and interaction with complex environments, thus enabling more human-like operations and problem-solving.
What is ReAct?
Short for Reasoning + Acting. ReAct empowers LLMs to reason like humans and interact with simulated environments. This facilitates richer interactions, improves decision-making, and enables them to utilize external tools.
How Does React Work?
ReAct structures complex tasks into smaller, actionable components, enabling LLMs to strategically utilize a suite of designated tools that align with the user's input. The LLM assesses each tool's relevance to the task at hand, and following those actionable insights, it refines its reasoning process and decision-making. This is complemented by ReAct's integration with external tools and services, which the LLM leverages for effective task execution and information acquisition
Optimizing tool usage
To effectively apply React, provide the LLM with detailed tool descriptions. These descriptions should outline the tool’s purpose, functionality, and any relevant information that helps the LLM determine when to utilize it. For example: "This tools is used for querying internal VectorDB with all the medical documents from years 2016 to 2023, it can be useful when getting question about internal medical case"
Using the UI
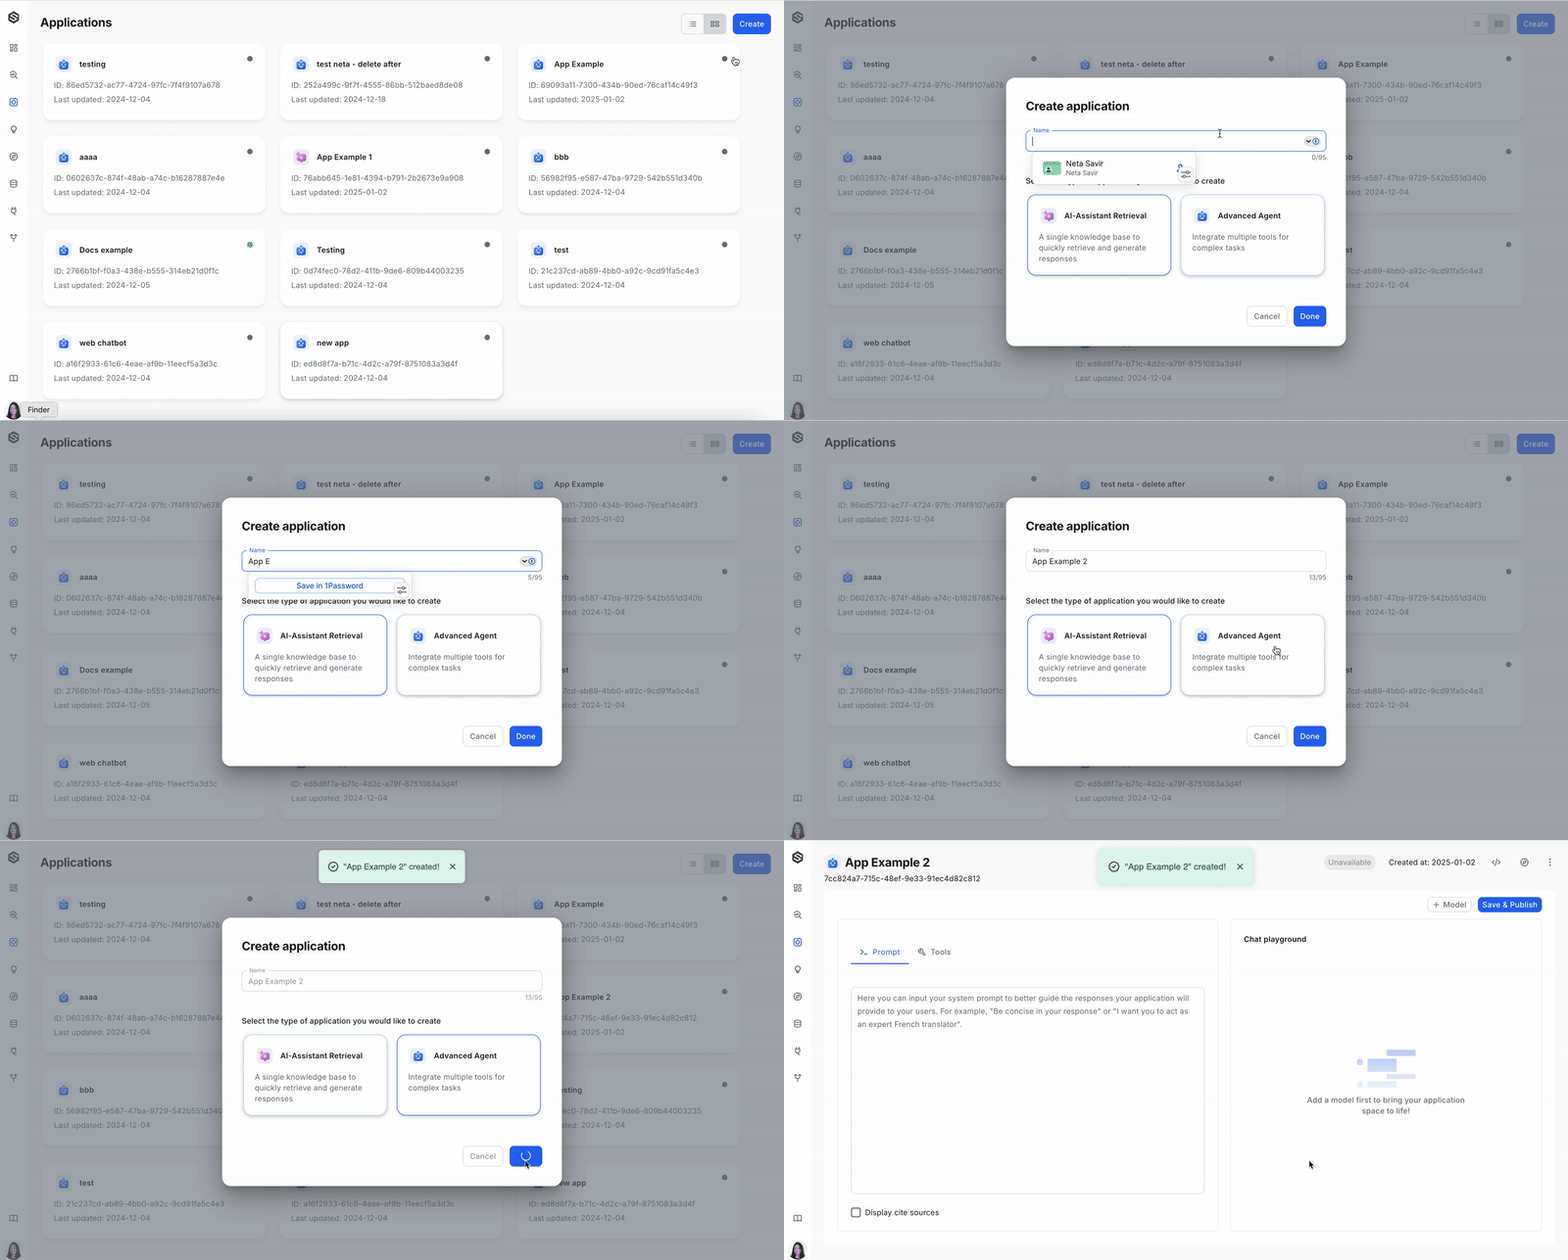
Step 1: Create your application
First things first, let’s create your chat application:
- Hit the Create button in the Applications screen to start the process.
- Enter a meaningful name for your chat application that reflects its purpose or the service it will provide.
- Select the application type "Advanced agent"
Step 2: Connect an LLM
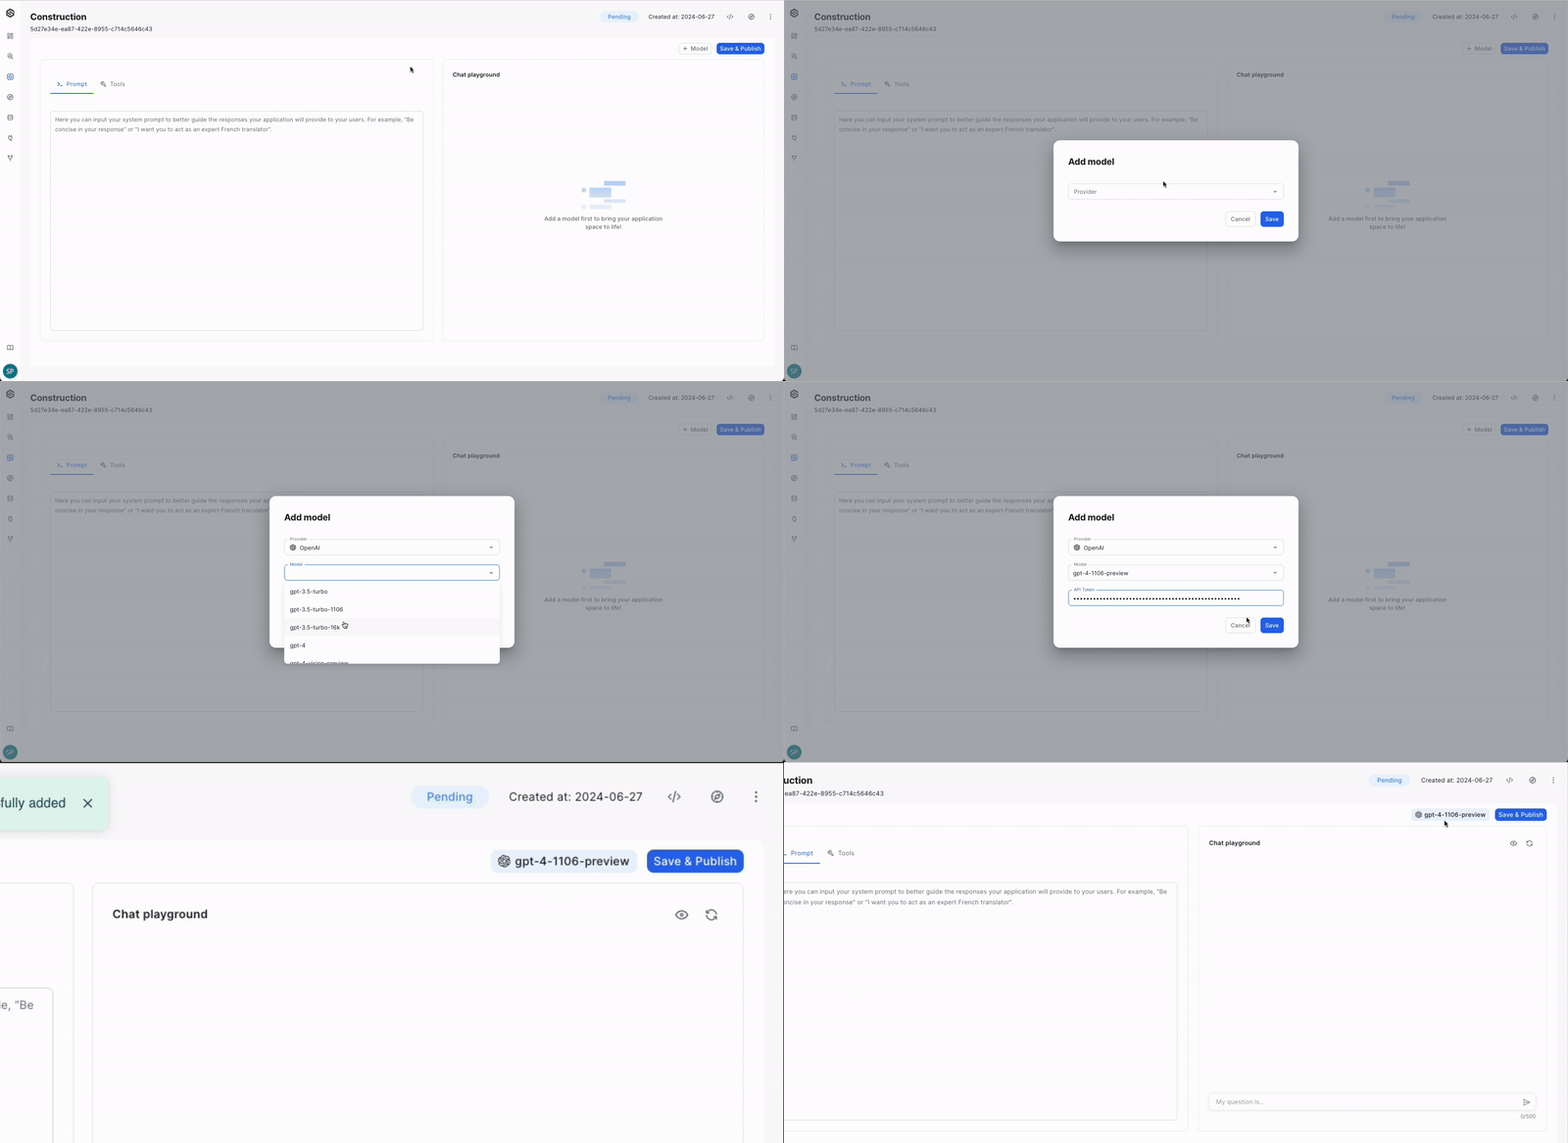
To activate your chat application, it's crucial to connect it to an LLM. Your application will not function until this step is completed:
- Select your desired model provider from the following options:
- OpenAI
- GoogleAI
- OpenAI Compatible
- Anthropic
- Depending on your chosen provider, complete the following:
- Choose your preferred model and version from the available list if using OpenAI or GoogleAI.
- Provide the API key or connection details necessary to establish a link between Superwise and the LLM model.
- Test your application connection
Good to know
Utilize the Playground to immediately test the chat application with the connected LLM.
Step 3: Save & Publish
You're just a step away from launching your chat application:
- Click the"Save & Publish" button to finalize and go live.
- Post-publishing, the application is prepared for embedding within your platform
Additional configuration options
Maximize the potential of your chat application with these extra features:
- Add a prompt: Customizing the initial prompt enables the assistant to perform better by providing context and setting the direction of the conversation. You can read more about Prompt engineering guidelines here.
- Add tool:SUPERWISE® provides you with the means to construct tools that connect to various data sources, enhancing your model's intelligence.. For more information, follow this link.
Using the SDK
Prerequisites
To install and properly configure the SUPERWISE® SDK, please visit the SDK guide.
Step 1: Create model
Select a model that will form the cornerstone of your application.
from superwise_api.models.application.application import OpenAIModel, OpenAIModelVersion

llm_model = OpenAIModel(version=OpenAIModelVersion.GPT_4, api_token="Open API token")
If you want to see what models are available from the provider and their versions, please use the following code:
List current supported external providers
from superwise_api.models.application.application import ModelProvider

[provider.value for provider in ModelProvider]
List current supported model versions
from superwise_api.models.application.application import GoogleModelVersion, OpenAIModelVersion, AnthropicModelVersion

display([model_version.value for model_version in GoogleModelVersion])
display([model_version.value for model_version in OpenAIModelVersion])
display([model_version.value for model_version in AnthropicModelVersion])
Step 2: Create application
from superwise_api.models.application.application import ReactAgentConfig

app = sw.application.create(
    name="My Application name",
    additional_config=ReactAgentConfig(tools=[tool_1, tool_2]),
    llm_model=llm_model,
  	prompt=None
)
Modify model parameters
In the context of Large Language Models (LLMs), parameters are the adjustable factors that influence how the model generates text and makes decisions based on given inputs.
- Temperature: Controls the randomness of the model’s outputs; lower values produce more deterministic responses, while higher values increase variety.
- OpenAI: The temperature value can range between 0 and 2, with a default value of 0.
- GoogleAI: The temperature value can range between 0 and 1, with a default value of 0.
- Top-p (Nucleus Sampling): Limits the model’s output options to a subset of the highest-probability tokens that collectively account for a probability mass of p, ensuring more coherent text generation.
- The top-p value can range between 0 and 1, with a default value of 1.
- Top-k Sampling: Restricts the model to sampling from the top k most probable tokens, reducing the likelihood of selecting less relevant words.
- The top-k value can be any positive integer, with a default value of 40.
Model parameters availability
Please note that parameters are available only on GoogleAI and OpenAI models, and currently, they are accessible exclusively through the SDK. Additionally, the top-k parameter is exclusively available on GoogleAI models.
from superwise_api.models.application.application import GoogleModel, GoogleModelVersion, GoogleParameters

model = GoogleModel(version=GoogleModelVersion.GEMINI_1_5, api_token="Add your API token", parameters=GoogleParameters(temperature=1,top_p=0.9,top_k=30))
app = sw.application.put(str(app.id),
                         additional_config=ReactAgentConfig(tools=[tool_1, tool_2]),
                         llm_model=llm_model,
                         prompt=None,
                         name="Application name"
                        )
Connect a tool to your application
SUPERWISE® provides you with the means to construct tools that connect to various data sources, enhancing your model's intelligence.
Before you begin
Before you begin crafting your tool, ensure you have an active application. If you have not yet set up an application, please refer to the quickstart guide for instructions on how to create one swiftly and successfully.
Once your application is established, you can proceed with the following:
- Create a DB Tool: Develop a tool that connects your application to your structured SQL database, facilitating efficient query execution.
- Create a Vector DB Tool: Formulate a tool that links your application to your stored embeddings, empowering your application with deeper, context-aware data insights.
- Create an OpenAPI tool: Develop a tool to seamlessly integrate your application with any external API using an OpenAPI schema. This enhances your app's capabilities by leveraging diverse external resources, broadening data inputs, functionalities, and incorporating external AI agents to expand your model’s knowledge and potential
- Create a Knowledge tool: Develop a tool that connects your application directly to your pre-created knowledge base within Superwise, enhancing responsiveness and enriching user experience.
SQL DB tool
By using the DB tool, you can connect your database and provide the model with valuable context, improving the quality of interactions. Learn more about the tool concept here
Here’s how you can do it:
Database support and configuration
Supported DB's
Ensure that your database is one of the following supported types:
- PostgreSQL (dialect:
postgresql)- MySQL and MariaDB (dialect:
mysql)- Oracle (dialect:
oracle)- Microsoft SQL Server (dialect:
mssql)- BigQuery
Password limitations
Please note that passwords should not contain the characters
@and:. If your password includes these characters, you will need to modify them in your connection string as follows:
- Replace
@with%40. For example:dialect://admin:My%[email protected]/dbtest- Replace
:with%3A. For example:dialect://admin:My%[email protected]/dbtest
Database Query Limit Notice
To maintain optimal performance, each query is currently capped at a limit of 100 entries.
Postgres table schema
Please ensure that all column names are in lowercase with no capital letters.
Using the UI
Step 1: Add the DB tool
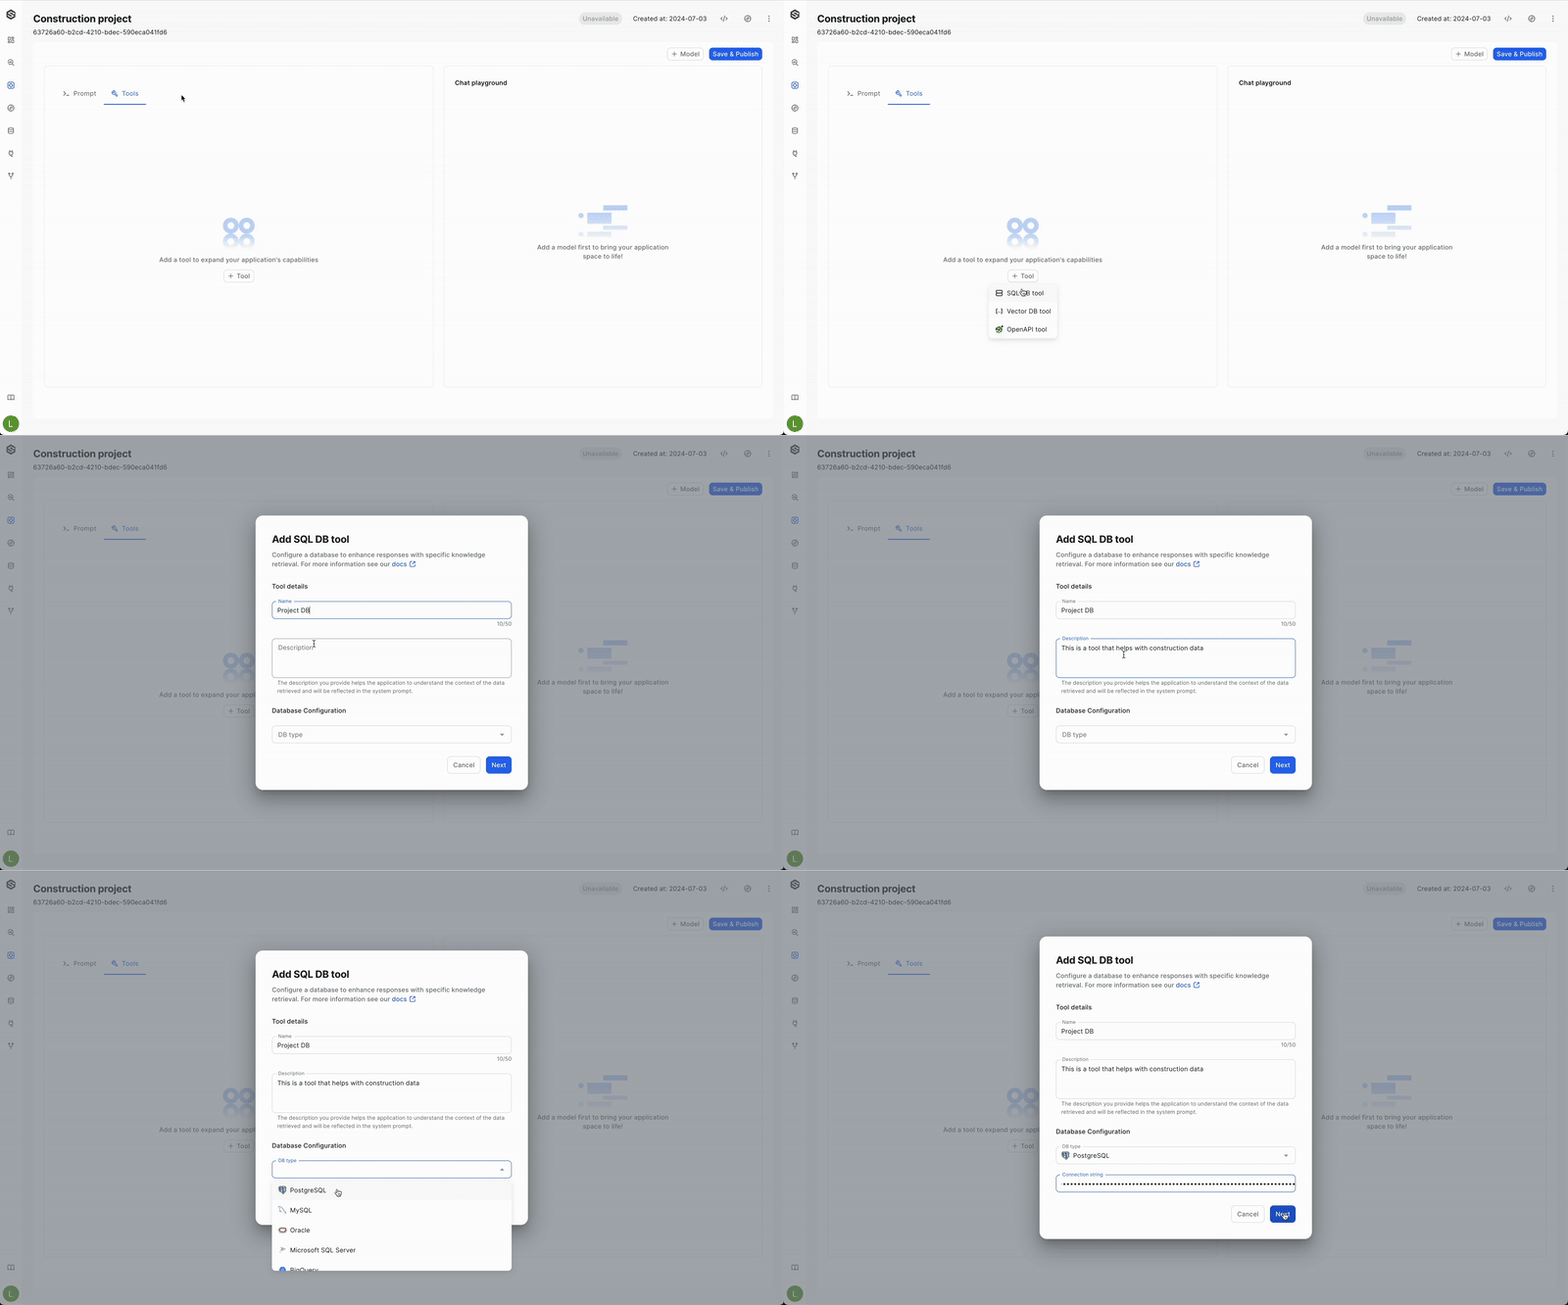
Click on the "+ Tool" button, and then SQL DB tool" start setting up the database connection.
Step 2: Configure the tool
- Assign a meaningful name to the tool. This name will help the model understand the context in which the data will be used.
- Add a description: Provide a thorough description of the database and its use. This information assists the model in contextualizing the data and influences the prompts generated by the system.
- Database Selection and Connection: Identify and connect to your chosen database by providing the requisite details:
- For BigQuery:
- Specify your
BigQuery project. - Input the
BigQuery datasetyou intend to query. - Input your
GCP service accountinformation for credential validation (in a JSON format).
- Specify your
- For Other Database Types:
- Construct your Database URL in the format:
dialect://username:password@host:port/database. Ensure you replace the placeholders with actual values specific to your database credentials and connection information.
- Construct your Database URL in the format:
- For BigQuery:
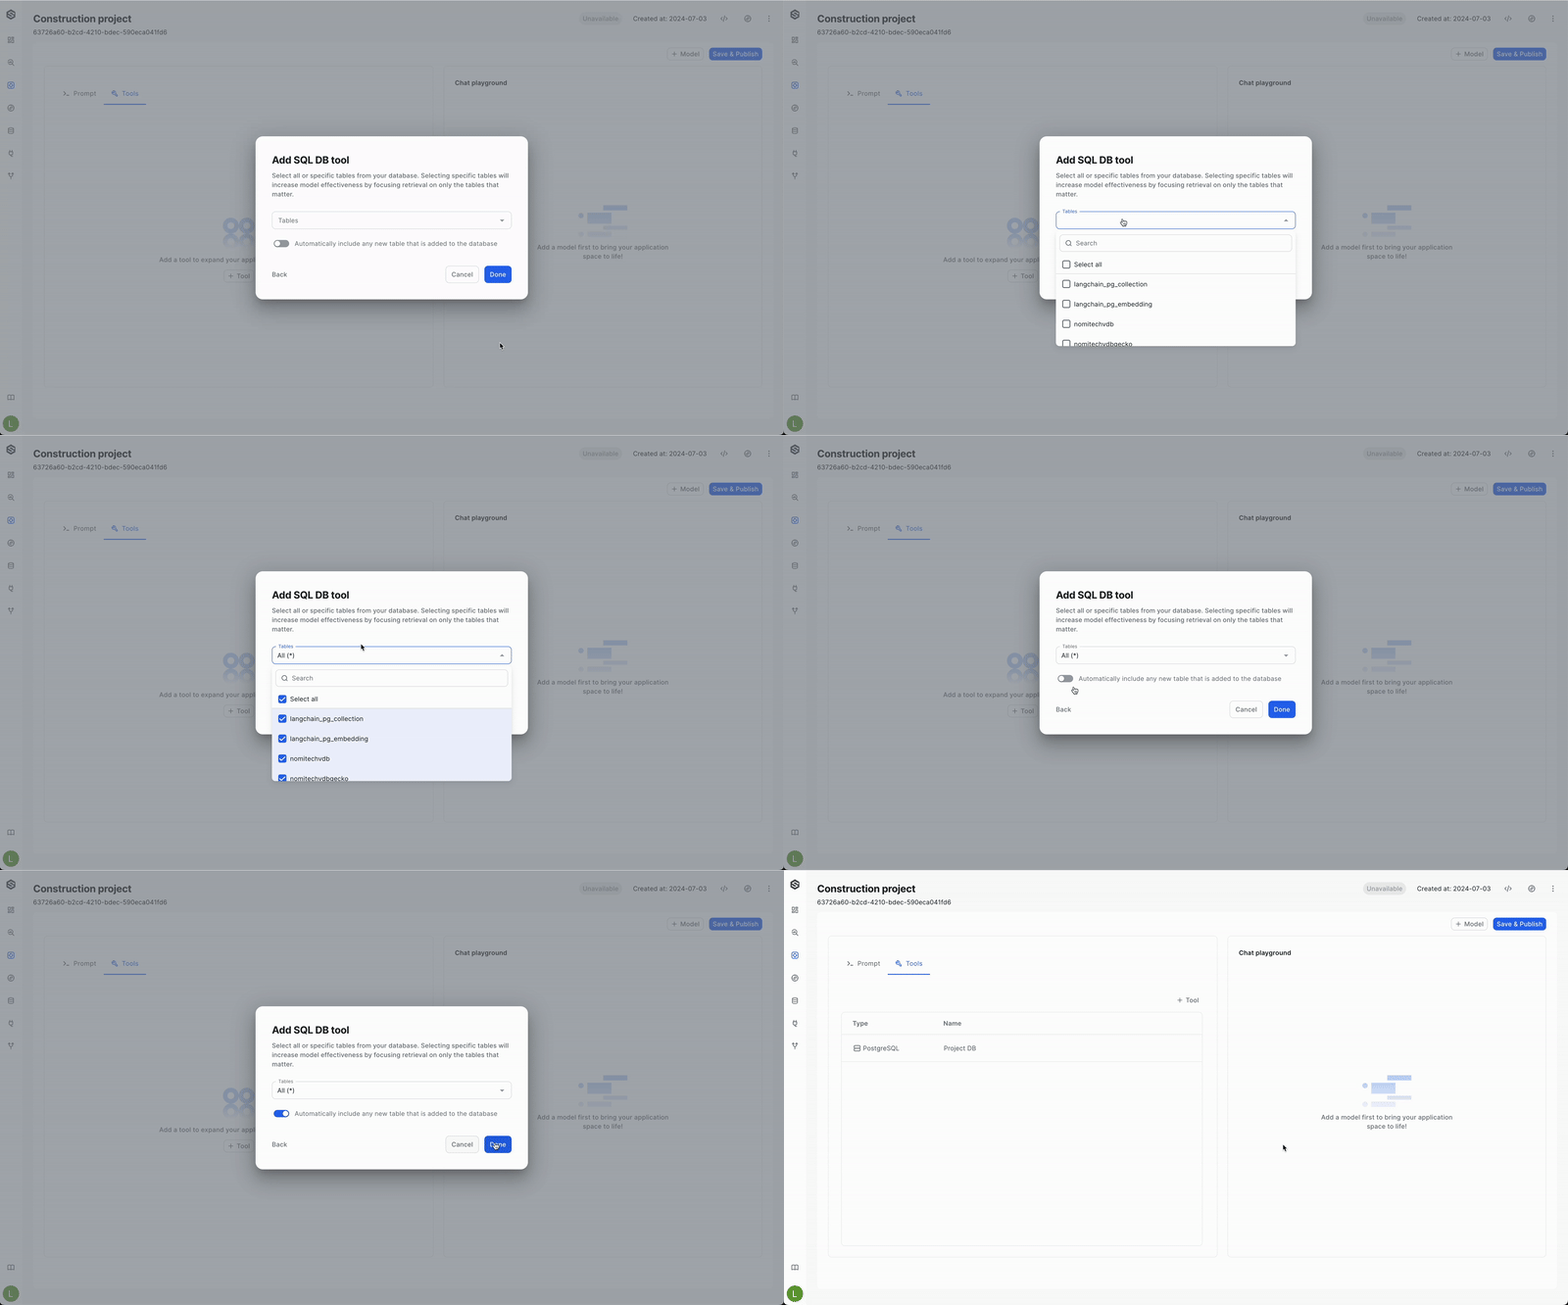
- Select specific tables for your tool: To enhance application performance and control access to specific tables in your database, you can configure your tool to access only selected tables. You have the flexibility to choose which tables your tool can access, grant access to all tables if needed, and enable automatic inclusion of any new tables added to the database.
Using the SDK
To create a DB tool using the SDK, use the code snippet below as a guide and include the following details:
-
Assign a meaningful name to your tool. The chosen name will aid the model in recognizing the context for which the data is intended.
-
Provide a comprehensive description of the tool. Elaborate on the database’s purpose and its operational context. This description helps the model to contextualize the data, thereby enhancing the relevance and accuracy of the system-generated prompts
-
Connection configuration:
- For BQ db type: specify your
project_id,dataset_idandservice accountin a JSON format - For Other Database Types: Specify the connection string in the given format:
dialect://username:password@host:port/database. Make sure to substitute the placeholders with your actual database credentials and details.
- For BQ db type: specify your
-
Select specific tables for your tool: To enhance application performance and control access to specific tables in your database, you can configure your tool to access only selected tables. You have the flexibility to choose which tables your tool can access, grant access to all tables if needed, and enable automatic inclusion of any new tables added to the database.
Create BQ DB tool example:
from superwise_api.models.tool.tool import ToolDef, ToolConfigBigQuery, ToolType, ToolConfigSQLMetadata
from superwise_api.models.application.application import AdvancedAgentConfig

bigquery_tool = ToolDef(
            name="My tool name",
            description="Describe this tool for the LLM",
            config=ToolConfigBigQuery(
                type=ToolType.SQL_DATABASE_BIGQUERY,
            		project_id="project_id",
            		dataset_id="dataset_id",
            		config_metadata=ToolConfigSQLMetadata(include_tables=["Tables to include"]), #Optional
            		service_account={SERVICE_ACCOUNT_JSON},
            )
        )
updated_app = sw.application.put(str(app.id),
                                 llm_model=model,
                                 prompt=None,
                                 additional_config=AdvancedAgentConfig(tools=[bigquery_tool]),
                                 name="My application name"
                                )
Create all other DB types tool example code:
from superwise_api.models.tool.tool import ToolDef, ToolConfigSQLDatabasePostgres, ToolConfigSQLMetadata, ToolType
from superwise_api.models.application.application import AdvancedAgentConfig

postgres_tool =  ToolDef(
            name="My tool name",
            description="Describe this tool for the LLM",
            config=ToolConfigSQLDatabasePostgres(
            type=ToolType.SQL_DATABASE_POSTGRES,
            config_metadata=ToolConfigSQLMetadata(exclude_tables=["Tables to exclude"]), #Optional
            connection_string="[connection_string]",
            )
        )
updated_app = sw.application.put(
  str(app.id),
  llm_model=model,
  prompt=None,
  additional_config=AdvancedAgentConfig(tools=[postgres_tool]),
  name="My application name"
)
ToolConfigSQLMetadata object
To select specific tables, you can use either the
include_tableslist or theexclude_tableslist:
include_tables: Specify the tables you want to include. Note that any new tables added to the database will not be automatically included in this list.exclude_tables: Specify the tables you want to exclude. This allows new tables added to the database to be automatically included in your tool's table list.- If you want your tool to access all tables, including any new tables added to the database, simply omit the
config_metadatafield when creating the tool. This configuration will be applied automatically.
Test connection
SUPERWISE® offers you the option to check the connection to your resources in any given time by using the following API call
Example: Test connection to BQ
POST app.superwise.ai/v1/applications/test-tool-connection

{
    "type": "BigQuery",
    "project_id": "project_id",
    "dataset_id": "dataset_id",
    "service_account": {
            "type": "service_account",
            "project_id": "",
            "private_key_id": "",
            "private_key":"",
            "client_email": "",
            "client_id": "",
            "auth_uri": "",
            "token_uri": "",
            "auth_provider_x509_cert_url": "",
            "client_x509_cert_url":"",
            "universe_domain":""
}
VectorDB tool
VectorDB is a robust tool enabling you to generate embeddings for your content, such as websites or extended texts, and store them in your dedicated VectorDB. Once stored, SUPERWISE® facilitates the retrieval of data from these embeddings, allowing your application's model to utilize it for additional context. Currently, SUPERWISE® offers support for pgvector (PostgreSQL) and Pinecone. Learn more about the tool concept here
Pay attention
Please note that to achieve this successfully, you must use the same embedding model in SUPERWISE® that you used to store the data.
PostgreSQL limitations
- Password limitations: Please note that passwords should not contain the characters
@and:. If your password includes these characters, you will need to modify them in your connection string as follows:
- Replace
@with%40. For example:dialect://admin:My%[email protected]/dbtest- Replace
:with%3A. For example:dialect://admin:My%[email protected]/dbtest- Table schema limitation: Please ensure that all column names are in lowercase with no capital letters.
Pinecone End-to-End Example
For your convenience, we provide a comprehensive end-to-end example in a Google Colab notebook for using Pinecone. This example covers everything from creating the index to setting up the vector database tool on our platform. Enjoy!
PGvector Prerequisite: Setting up vectorDB for Superwise integration
Before you begin, ensure your database meets the following requirements:
When connecting Postgres vectorDB to the Superwise application, the following tables are required in the database:
langchain_pg_collection
This table is used to save all the collections of documents (referred to as a "table" in the Superwise platform).
DDL:
CREATE TABLE public.langchain_pg_collection (
    name varchar NULL,
    cmetadata json NULL,
    uuid uuid NOT NULL,
    CONSTRAINT langchain_pg_collection_pkey PRIMARY KEY (uuid)
);
Columns explanation:
- name: The name of the collection (this is the table_name when creating the tool).
- cmetadata: Metadata for the collection.
- uuid: The ID of the collection.
langchain_pg_embedding
This table is connected to the langchain_pg_collection table and stores documents along with their embeddings.
DDL:
CREATE TABLE public.langchain_pg_embedding (
    collection_id uuid NULL,
    embedding public.vector NULL,
    document varchar NULL,
    cmetadata json NULL,
    custom_id varchar NULL,
    uuid uuid NOT NULL,
    CONSTRAINT langchain_pg_embedding_pkey PRIMARY KEY (uuid)
);

ALTER TABLE public.langchain_pg_embedding
ADD CONSTRAINT langchain_pg_embedding_collection_id_fkey
FOREIGN KEY (collection_id)
REFERENCES public.langchain_pg_collection(uuid)
ON DELETE CASCADE;
Columns explanation:
- collection_id: The ID of the collection the document is connected to.
- document: The text document.
- embedding: Embedding of the document.
- cmetadata: Metadata for the embedding (to enable cite sources, it should contain the source information like this: {"source": "https://js.langchain.com/docs/modules/memory").
- custom_id: User-defined custom ID.
- uuid: The ID of the document embedding.
Using the UI
This guide will walk you through creating a VectorDB tool using the user interface (UI) client. VectorDB tools help connect your system to a database containing vector embeddings, which can be used to enrich prompts and improve model understanding.
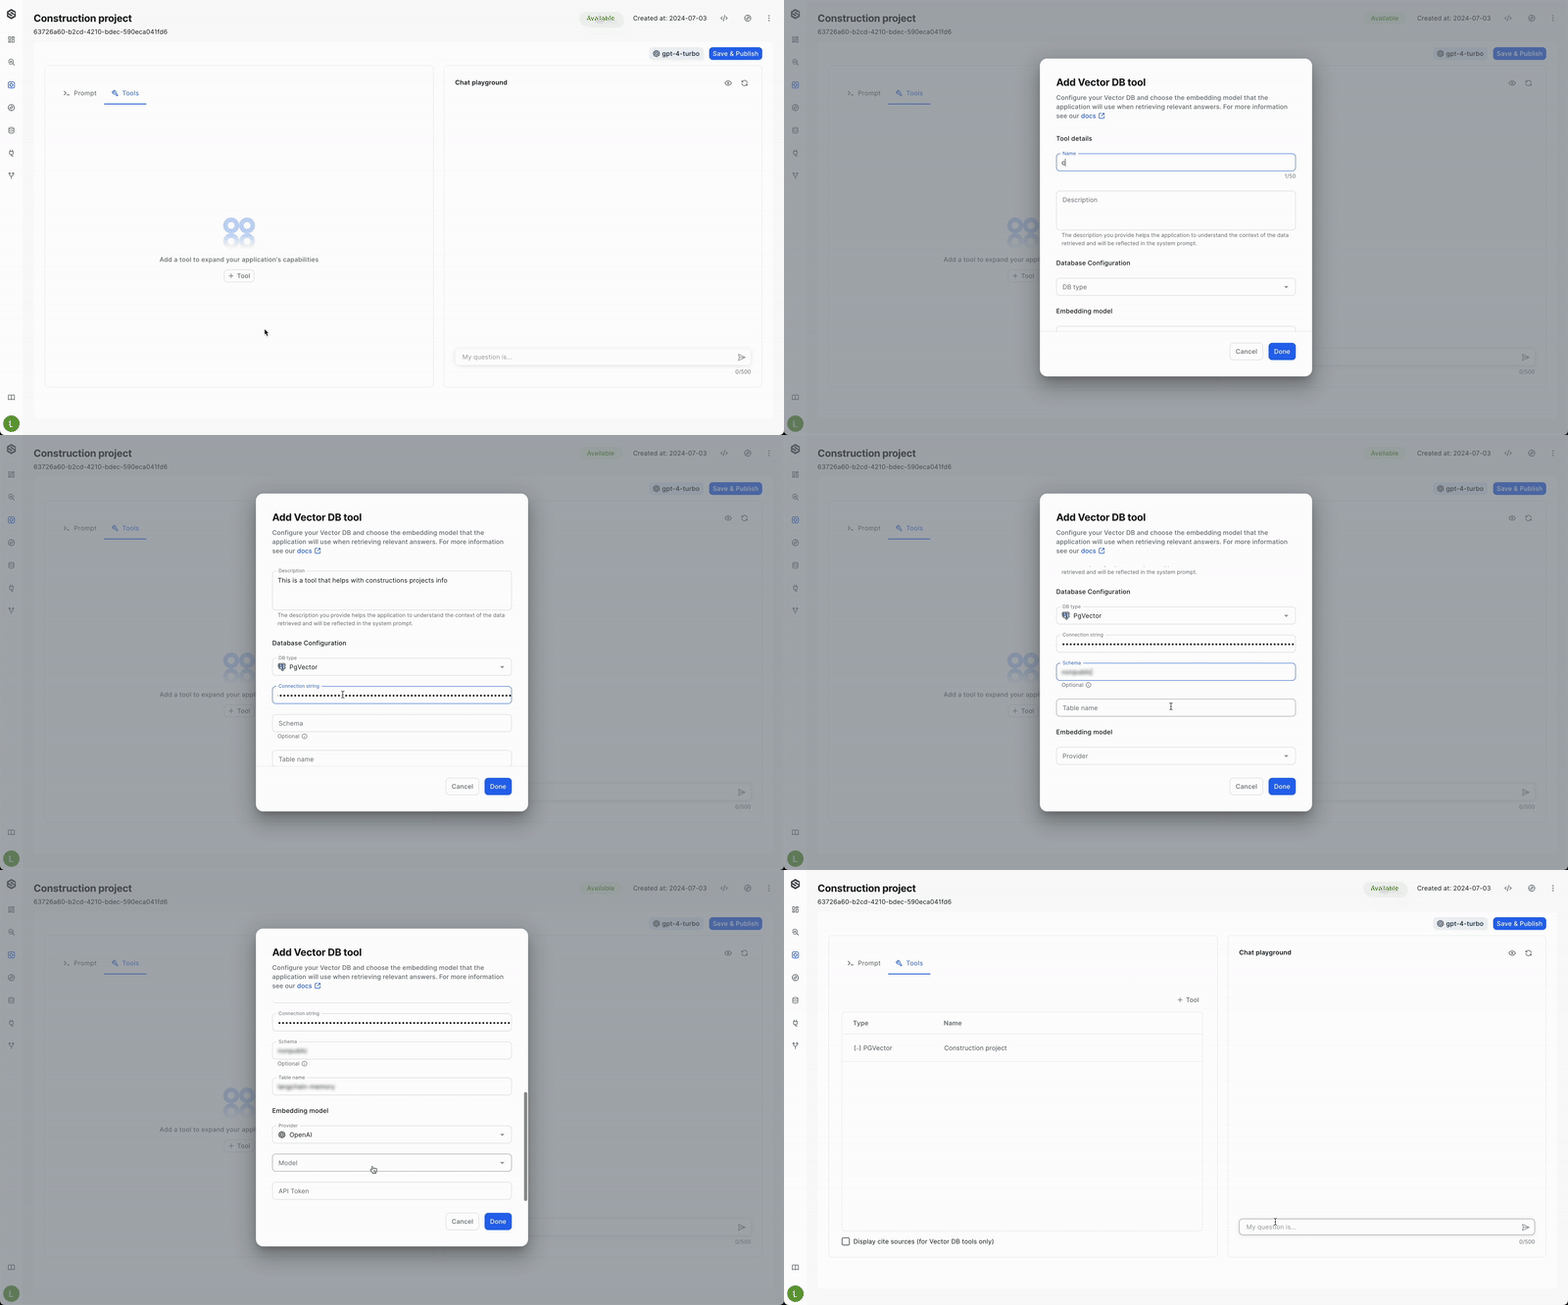
- Add a New Tool:
- Click the "+ Tool" button. This opens a menu where you can choose the type of tool you want to add.
- Select "VectorDB tool" to begin setting up the connection.
- Name Your Tool: Assign a descriptive name to your tool. This helps the model understand the context in which the data will be used. For example, "Product Embeddings" or "Customer Search Vectors" would be good choices.
- Describe Your tool: Consider adding a comprehensive description of your tool. This helps the model understand the purpose and context of your database. Explain what kind of data the embeddings represent (e.g., product descriptions, user profiles) and how they are used in your system. This information can improve the relevance and accuracy of the prompts generated by the model
- Choose the VectorDB Type: This refers to the specific type of database technology used for your VectorDB. If you're unsure, consult your system administrator.
- Connect to Your Database: Enter the necessary connection details to connect to your VectorDB instance. The required details vary depending on the specific VectorDB you are using:
- Pgvector:
- Provide the connection string in the following format:
postgresql://username:password@host:port/database - Enter schema name (Optional)
- Enter the table name
- Provide the connection string in the following format:
- Pinecone:
- Enter your Pinecone API key
- Provide the Index name
- Pgvector:
- Link your embedding model : Provide information about the specific model here. Please pay attention that to achieve this successfully, you must use the same embedding model in SUPERWISE® that you used to store the data.
By following these steps, you'll successfully set up a VectorDB tool within the UI. This will allow your system to leverage the power of vector embeddings, potentially leading to improved performance and more insightful results.
Using the SDK
To begin crafting your VectorDB tool with the help of the SDK, you'll find the provided code snippets below as an invaluable guide. These snippets will lead you through the necessary steps to integrating the VectorDB tool into your workflow
Step 1: Create embedding model
OpenAI embedding model
from superwise_api.models.tool.tool import OpenAIEmbeddingModel, EmbeddingModelProvider, OpenAIEmbeddingModelVersion

openai_embedding_model=OpenAIEmbeddingModel(
  provider=EmbeddingModelProvider.OPEN_AI,
  version=OpenAIEmbeddingModelVersion.TEXT_EMBEDDING_ADA_002,
  api_key="Your API key"
)
Google Vertex AI Model Garden embedding model
from superwise_api.models.tool.tool import EmbeddingModelProvider, VertexAIModelGardenEmbeddingModel

vertex_embedding_model=VertexAIModelGardenEmbeddingModel(
  provider=EmbeddingModelProvider.VERTEX_AI_MODEL_GARDEN,
  project_id="Your project id",
  endpoint_id="Your endpint id",
  location="us-central1",
  service_account={SERVICE_ACCOUNT}
)
Step 2: Create tool
Tool creation includes the following details:
- Assign a meaningful name to your tool. The chosen name will aid the model in recognizing the context for which the data is intended.
- Connect to Your Database: Enter the necessary connection details to connect to your VectorDB instance. The required details vary depending on the specific VectorDB you are using:
- Pgvector:Provide the connection string in the following format:
postgresql://username:password@host:port/database, Schema name (optional) and table name - Pinecone: Enter your Pinecone API key and Provide the Index name
- Pgvector:Provide the connection string in the following format:
- Provide a comprehensive description of the tool. Elaborate on the database’s purpose and its operational context. This description helps the model to contextualize the data, thereby enhancing the relevance and accuracy of the system-generated prompts
- Link your embedding model : Provide information about the specific model here. Please pay attention that to achieve this successfully, you must use the same embedding model in SUPERWISE® that you used to store the data.
Pgvector code example:
from superwise_api.models.application.application import AdvancedAgentConfig
from superwise_api.models.tool.tool import ToolDef, ToolType, \
    ToolConfigPGVector, EmbeddingModelProvider, \
    VertexAIModelGardenEmbeddingModel

vectordb_tool =ToolDef(
            name="Tool name",
            description="Describe this tool for the LLM",
            config=ToolConfigPGVector(
                type=ToolType.PG_VECTOR,
                connection_string="CONNECTION_STRING",
                table_name="Your table name",
              	db_schema="Your schema name",
                embedding_model=openai_embedding_model
            )
)

updated_app = sw.application.put(str(app.id),
                                 llm_model=model,
                                 prompt=None,
                                 additional_config=AdvancedAgentConfig(tools=[vectordb_tool]),
                                 name="My application name",
                                 show_cites=True
                                )
Pinecone code example:
from superwise_api.models.tool.tool import ToolDef, ToolType, ToolConfigPineconeVectorDB

vectordb_tool =ToolDef(
            name="Tool name",
            description="Describe this tool for the LLM",
            config=ToolConfigPineconeVectorDB(
                type=ToolType.PINECONE,
                api_key="Your pinecone key",
                index_name="Your index name",
                embedding_model=openai_embedding_model
            )
)

updated_app = sw.application.put(str(app.id),
                                 llm_model=model,
                                 prompt=None,
                                 additional_config=AdvancedAgentConfig(tools=[vectordb_tool]),
                                 name="My application name",
                                 show_cites=True
                                )
Test connection
SUPERWISE® offers you the option to check the connection to your resources in any given time by using the following API call
Test connection to pgvector
POST app.superwise.ai/v1/applications/test-tool-connection

{
    "type": "PGVector",
    "connection_string": "",
    "table_name": "",
    "embedding_model": {
        "provider": "VertexAIModelGarden",
        "project_id": "",
        "location": "",
        "endpoint_id": "",
    		"service_account": {
            "type": "service_account",
            "project_id": "",
            "private_key_id": "",
            "private_key":"",
            "client_email": "",
            "client_id": "",
            "auth_uri": "",
            "token_uri": "",
            "auth_provider_x509_cert_url": "",
            "client_x509_cert_url":"",
            "universe_domain":""
				}
    }
}
Cite Sources
SUPERWISE® now provides the capability to view the sources behind the model’s responses, enhancing transparency and traceability in your data analysis. By citing sources, you can delve deeper into the origin of the data that influenced the model's decisions.
Important notice
The cite sources feature is available exclusively for VectorDB tools.
How to enable source citing in pgvector
To leverage this feature, you must first ensure that your data is indexed correctly in VectorDB. Detailed below are the steps necessary to index your data for source citation:
Create a Document Store and Send to a Vector Database with pgvector
A step-by-step guide on how to embed text stores and send them to a vector database using pgvector. pgvector is an extension for PostgreSQL that allows the storage of high-dimensional vectors, enabling efficient similarity search and machine learning applications.
Prerequisites
Before you begin, ensure you have the following:
- PostgreSQL installed (version 13 or later is recommended).
- pgvector extension installed.
- Python environment with necessary libraries installed (such as psycopg2) for PostgreSQL connection and a vector embedding library (like transformers, or openai for built-in text embedding models).
Installation
- Install Necessary Libraries: In this example, we will use the out-of-the-box model embedding options provided by OpenAI. We will need the following libraries and packages:
!pip install langchain-openai langchain langchain-community pgvector
import os, json, openai
from langchain_community.vectorstores import PGVector
from langchain_community.document_loaders import DirectoryLoader
from langchain_core.embeddings import Embeddings
from langchain.schema.document import Document
from typing import List
from openai import OpenAI
- Load OpenAI API Key to Environment: We will also need an OpenAI API key for adding our embeddings to pgvector:
os.environ["OPENAI_API_KEY"] = KEY_STRING
Steps to Embed Text and Store in Vector Database
- Set PostgreSQL Connection String: Based on the credentials of your PostgreSQL vector database and the requirements for PostgreSQL secure database connections URLs, we can create a connection string, such as in this format:
conn_string = postgresql+psycopg2://{USER}:{PASSWORD}@{HOST}:{PORT}/{DB_NAME} - Assign Collection Name for Storing Vectors: Next, we want to create a new collection name, which will be assigned to a corresponding collection id in the langchain_pg_collection table. This id will be used to identify the embeddings for our new collection in the lanchain_pg_embeddings table.
collection_name = “documentation_tutorial” - Define Embedding Model: We can leverage one of OpenAI’s embedding models by defining a simple embedding class, as shown below:
client = OpenAI()

class OpenAIEmbeddings(Embeddings):
    def **init**(self, openai_api_key: str):
        self.api_key = openai_api_key
        openai.api_key = self.api_key

  	def embed_query(self, text: str) -> List[float]:
    	return self.embed_documents([text])[0]

    def embed_documents(self, texts: List[str]) -> List[List[float]]:
        embeddings = []
        for text in texts:
            embedding = client.embeddings.create(input = [text], model="text-embedding-3-small").data[0].embedding
            embeddings.append(embedding)
        return embeddings

embedding_model = OpenAIEmbeddings(openai_api_key=os.getenv("OPENAI_API_KEY"))
In this example, we are leveraging the “text-embedding-3-small” model for our embeddings. Note that, when we connect a Superwise application to this vector DB destination, we will need to assign an embedding model with the same embedding dimensionality as “text-embedding-3-small”. This embedding model will allow us to interface with our new vector DB collection in the application’s agent system.
- Convert Text to Langchain Documents and Add Source Metadata: We can specify a file directory of text files, each of which will be loaded as its own document, through langchain’s DirectoryLoader:
loader = DirectoryLoader(file_path, glob="\*.txt")
documents = loader.load()
Note that chunking large text corpora into smaller documents can be achieved by leveraging one of langchain’s Text Splitters.
Upon inspecting each document, we can see that, by default, the “metadata” field is populated with a document source, which corresponds to the full file path: metadata={'source': '/sample_text_docs/doc_one.txt'})
Manual metadata configurations may be implemented iteratively across a full list of texts (in this example, document_store). We can align our metadata fields to the cmetadata fields in our default langchain_pg_embeddings table:
documents = []
for text_doc in document_store:
	documents.append(Document(page_content = text_doc,
                            metadata = {"source": new_source,
                                        "title": new_title,
                                        "description": "",
                                        "language": "en"
                                       }
                           )
- Send Documents to PostgreSQL Vector Database: Finally, we can use the PGVector class from LangChain to create a vector store from a list of documents. The vector store is stored in a PostgreSQL database using the pgvector extension:
vectorstore = PGVector.from_documents(
    embedding=embedding_model,
    documents=documents,
    collection_name=collection_name,
    connection_string=conn_string,)
- Querying the Vector Database: To retrieve text entries, we can use vector queries on our newly created vector collection. Here’s an example:
conn = psycopg2.connect(conn_string)
cur = conn.cursor()
query = f"SELECT \* FROM langchain_pg_embedding e INNER JOIN langchain_pg_collection c ON e.collection_id = c.uuid WHERE c.name = "{collection_name}"
cur.execute(query)
rows = cur.fetchall()
pd.DataFrame(rows, columns = ["name", "cmetadata", "uuid"])
Note that, in this case, the connection string should assume the Keyword/Value Connection String format.
By following this guide, you can successfully embed text data, store it in a PostgreSQL database using the pgvector extension, and perform efficient similarity searches. This process enables powerful text processing and machine learning applications directly within your PostgreSQL database.
For further customization and optimization, refer to the documentation for pgvector and langchain.
By following these steps, you'll be able to make full use of the cite sources feature in SUPERWISE®, gaining deeper insights and confidence in the model’s responses
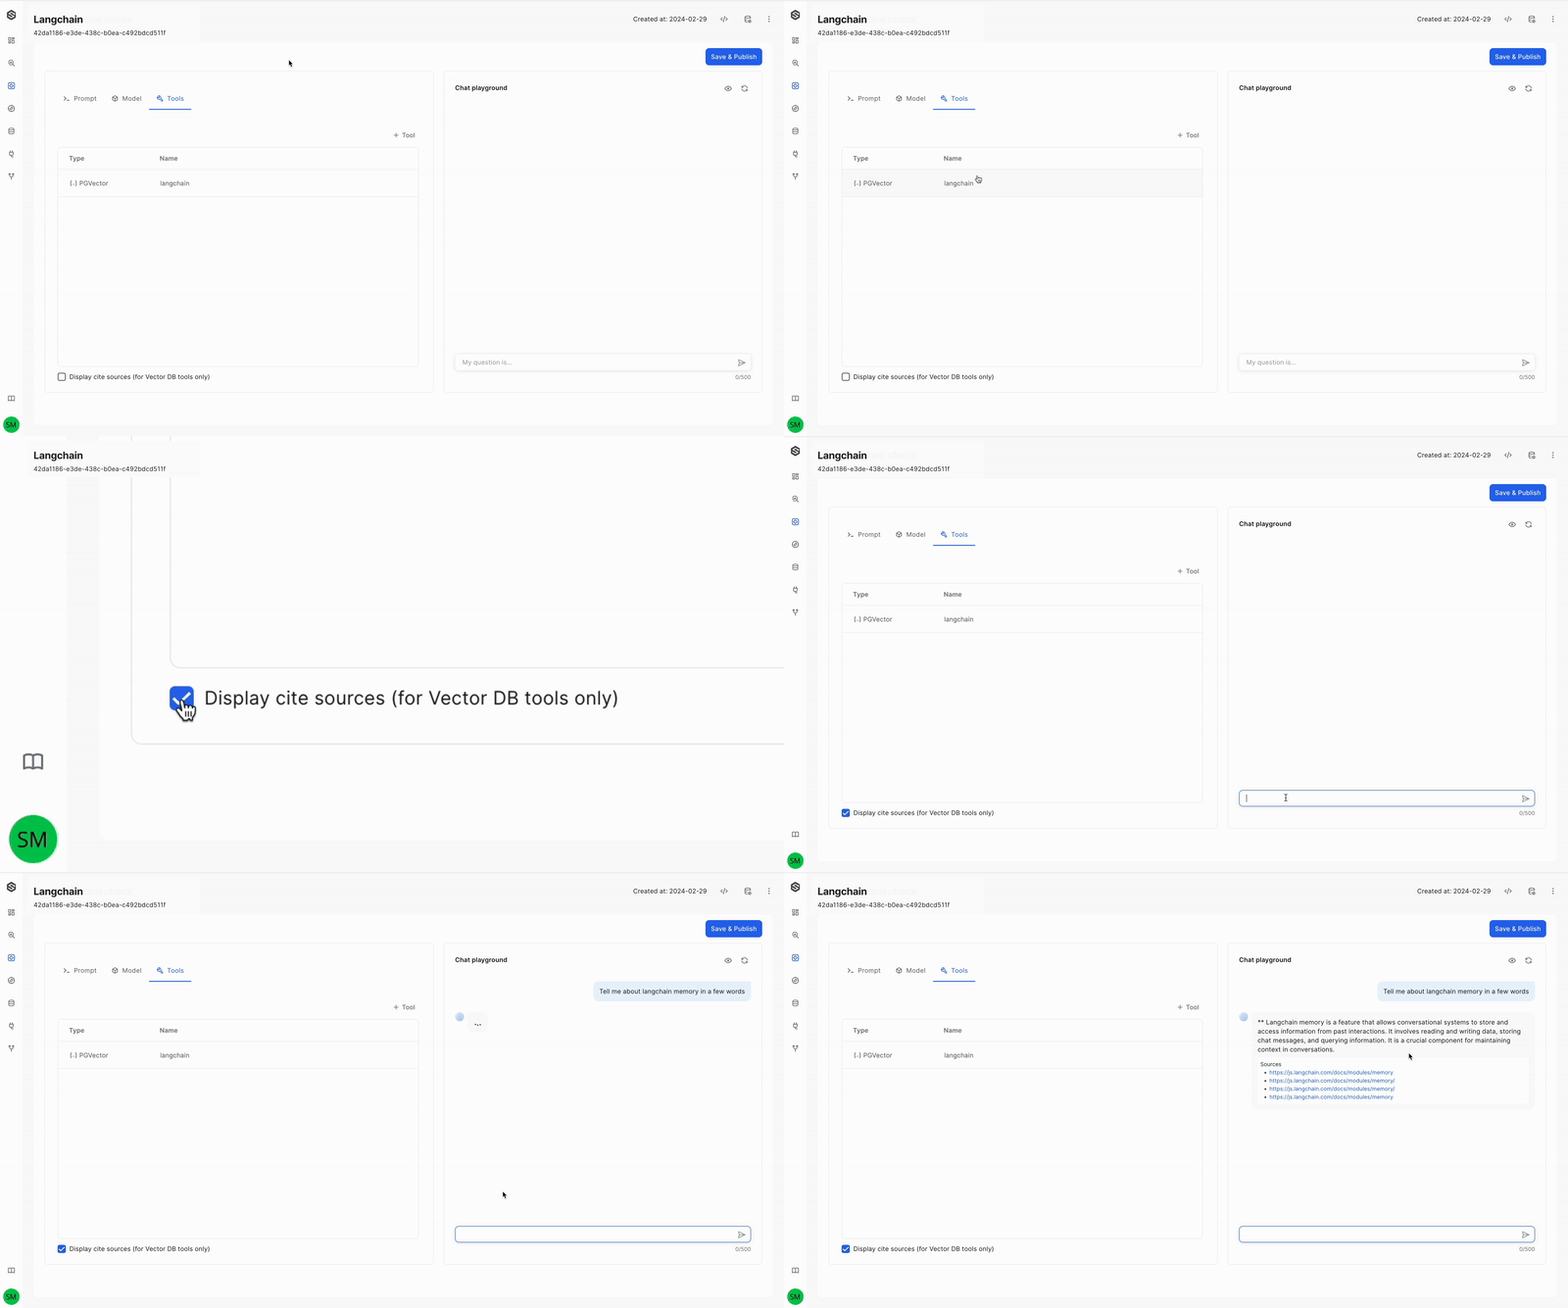
Enabling Cite Sources in the UI
After indexing the data and its sources as mentioned above, simply enable the "Display Cite Sources" option in the Tools tab of your application. This will allow you to view the sources for the model’s responses, enhancing the transparency of your data analysis.
OpenAPI tool
The OpenAPI tool is designed to integrate seamlessly with any external API that supports an OpenAPI schema. This functionality enables you to enhance your application's capabilities by leveraging a variety of external resources and services. By connecting with these APIs, you can enrich your models with a broader array of data inputs and functionalities, or include external AI agents in your app, thereby enriching your model's knowledge and expanding its potential. Learn more about the tool concept here
Here’s how you can do it:
Important Considerations!
- OpenAPI Version Compatibility: The OpenAPI tool is compatible only with OpenAPI versions 3.0 and above.
- Schema Format: The OpenAPI tool supports schemas only in JSON format.
- Supported Routes: Only GET and POST request methods are supported by the OpenAPI tool.
- Authorization: Currently, SUPERWISE® supports APIs that use either Bearer Token authentication or require no authorization.
Additional information
To read more on OpenAPI specifications follow the following link
Using the UI
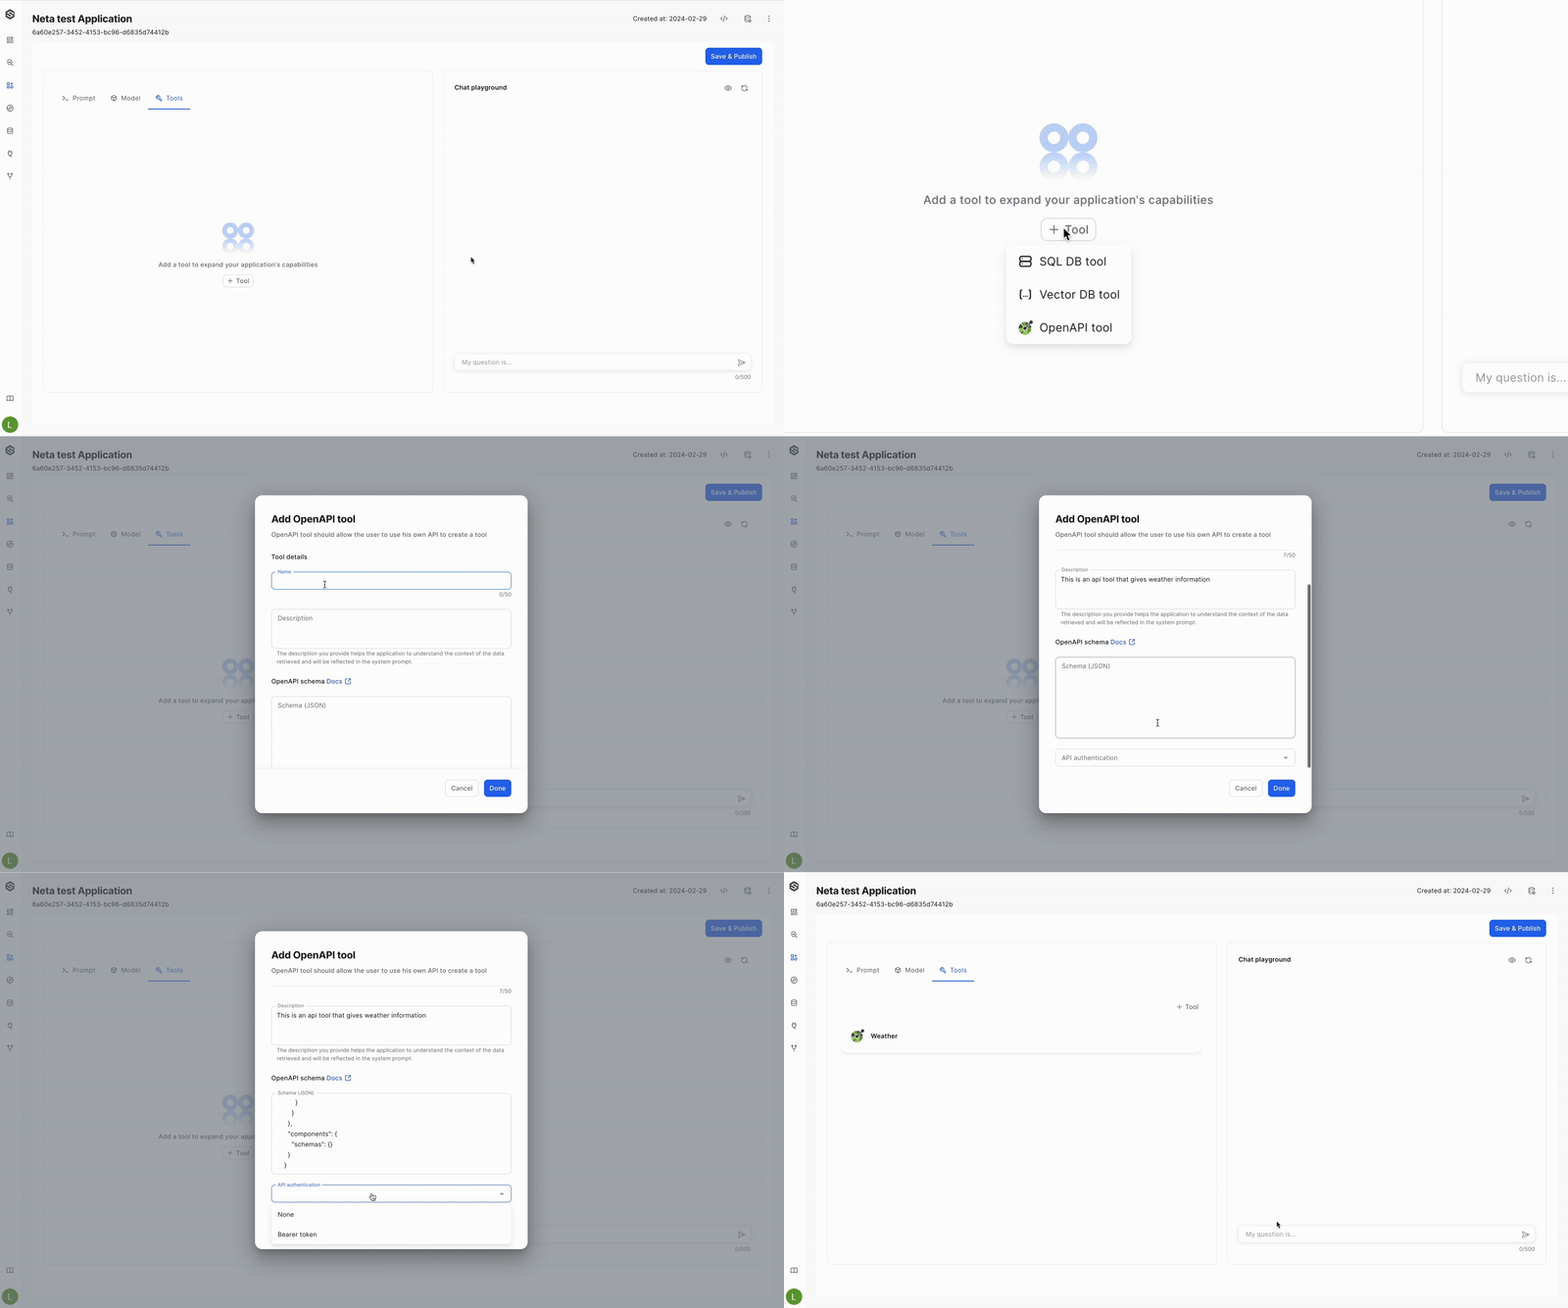
Step 1: Add the DB tool
Click on the "+ Tool" button, and then OpenAPI tool" start setting up the database connection.
Step 2: Configure the tool
- Assign a meaningful name to the tool. This name will help the model understand the context in which the data will be used.
- Add a description: Provide a detailed description of the API and its purpose. This information helps the model contextualize the data, influences the prompts generated by the system, and guides the model on when to effectively utilize this tool.
- Add OpenAPI schema: Upload a JSON-based OpenAPI schema that includes all the routes you want your application to access.
- Select authentication method: Select the authentication method and supply the relevant key if needed.
Usage example
This JSON represents an OpenAPI schema for an API, which enables you to input an IP address and retrieve the corresponding country. To utilize this schema, simply copy and paste it into the OpenAPI schema section of your tool.
{
  "info": {
    "title": "IP to Country API",
    "version": "1.0.0",
    "description": "A simple API to translate IP addresses to country codes."
  },
  "paths": {
    "/{ip}": {
      "get": {
        "summary": "Get country code from IP address",
        "responses": {
          "200": {
            "content": {
              "application/json": {
                "schema": {
                  "type": "object",
                  "properties": {
                    "ip": {
                      "type": "string",
                      "format": "ipv4",
                      "example": "9.9.9.9"
                    },
                    "country": {
                      "type": "string",
                      "example": "US"
                    }
                  }
                }
              }
            },
            "description": "Successful response"
          },
          "400": {
            "description": "Bad request (invalid IP address format)"
          },
          "404": {
            "description": "IP address not found"
          },
          "500": {
            "description": "Internal server error"
          }
        },
        "parameters": [
          {
            "in": "path",
            "name": "ip",
            "schema": {
              "type": "string",
              "format": "ipv4"
            },
            "required": true,
            "description": "The IP address to get the country code for."
          }
        ],
        "description": "Returns the country code associated with the provided IP address."
      }
    }
  },
  "openapi": "3.0.3",
  "servers": [
    {
      "url": "https://api.country.is"
    }
  ]
}
Using the SDK
To begin crafting your OpenAPI tool with the help of the SDK, refer to the provided code snippet below as an invaluable guide. This snippet will lead you through integrating the OpenAPI tool into your workflow.
from superwise_api.models.tool.tool import ToolDef, ToolConfigOpenAPI, ToolType
from superwise_api.models.application.application import AdvancedAgentConfig

openapi_tool = ToolDef(
    name="My tool name",
    description="Describe this tool for the LLM",
    config=ToolConfigOpenAPI(
        type=ToolType.OPENAPI,
        openapi_schema= openapi_schema,
        # if no authentication is required, then authentication=None
        authentication={
            "type": "Bearer",
            "token": "your_token_here",
        },
    ),
)

updated_app = sw.application.put(str(app.id),
                                 llm_model=model,
                                 prompt=None,
                                 additional_config=AdvancedAgentConfig(tools=[openapi_tool]),
                                 name="My application name")
Overriding Authentication header when using the API
If the authentication methods we provide ( None / Bearer token) doesn't match the authentication method you use, you can override the header by using:
payload = {
    "input": "user input here",
    "chat_history": [],
    "custom_headers": {
        "Authorization": "YOUR AUTH METHOD HERE"
    }
}
For example:
import requests

url = f"https://api.staging.superwise.ai/v1/app-worker/{app.id}/v1/ask"
token ='TOKEN'

payload = {
    "input": "user input here",
    "chat_history": [],
    "custom_headers": {
        "Authorization": f"Bearer {token}"
    }
}

headers = {
    "accept": "application/json",
    "content-type": "application/json",
    "x-api-token": "Applicatoin api token"
}

response = requests.post(url, json=payload, headers=headers)

print(response.text)
Knowledge tool
SUPERWISE® now enables you to boost your application by creating a tool that allows it to directly query your pre-created knowledge base within Superwise. For setup and indexing guidance, refer to pre-created Knowledge. This integration enhances your application's responsiveness and enriches user experience
Using the UI
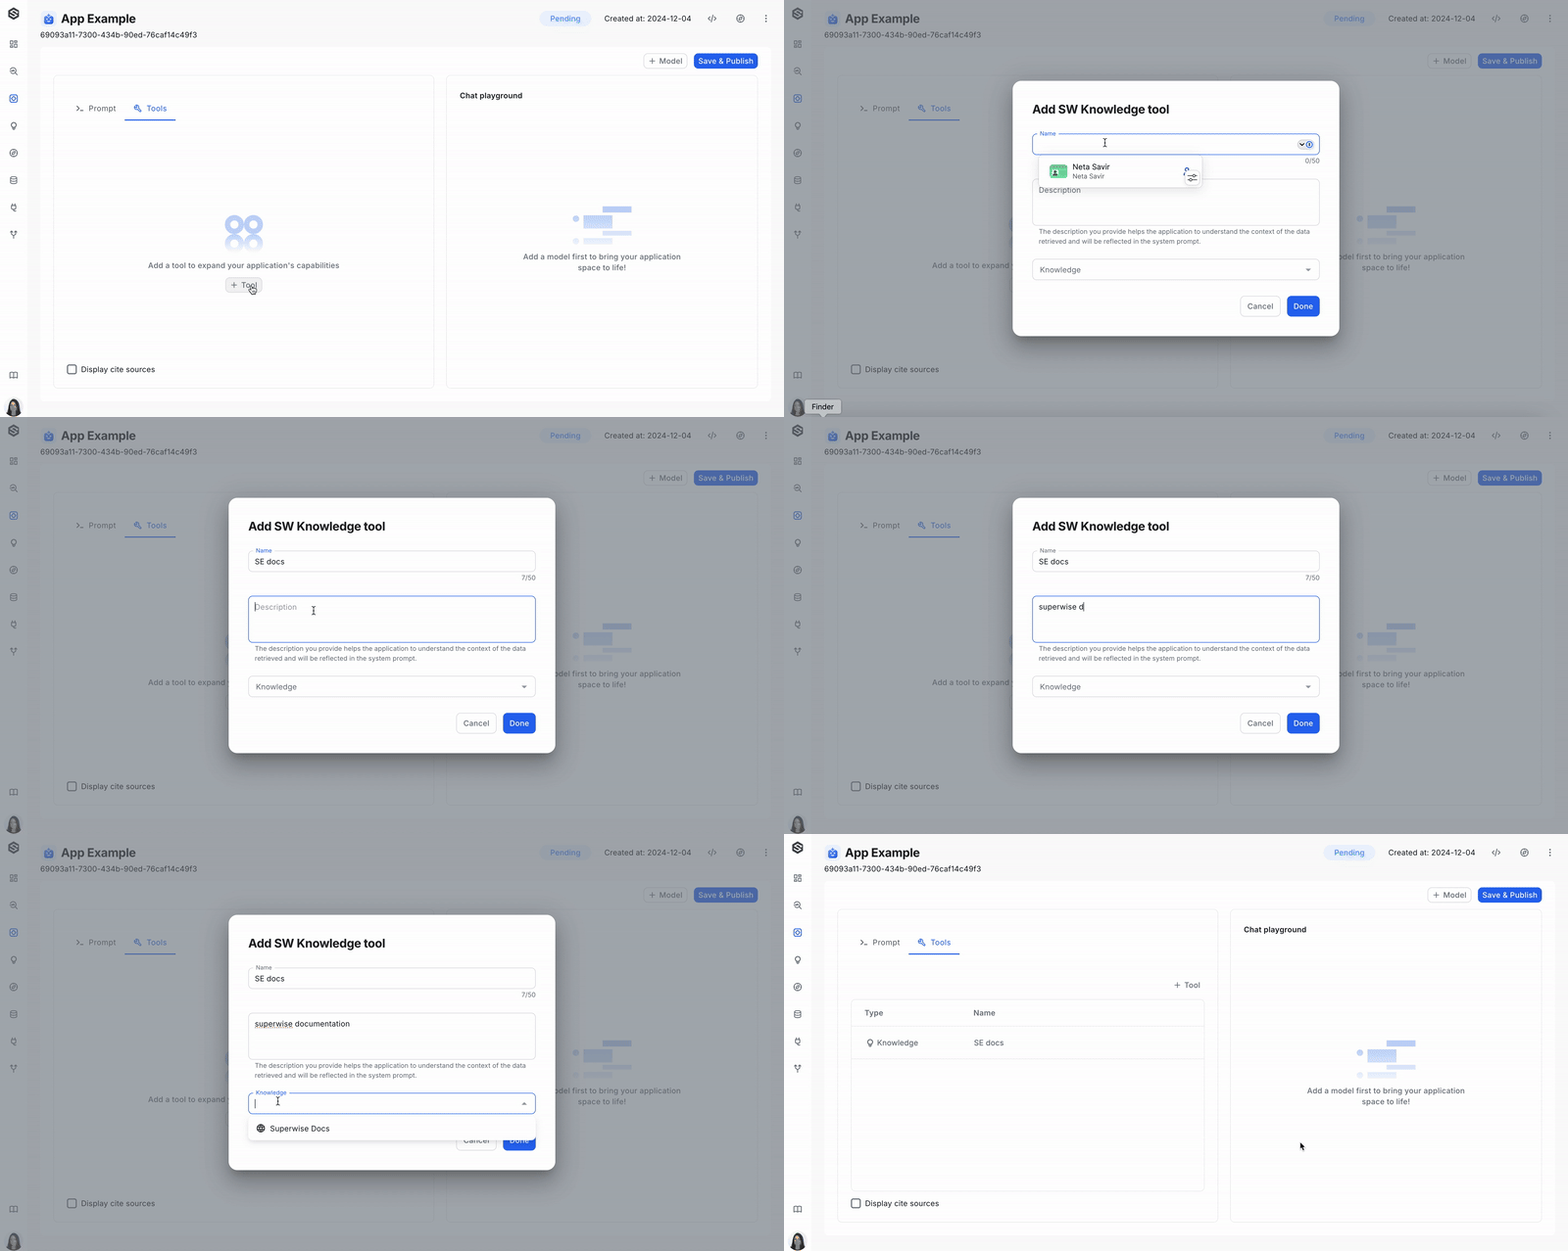
Step 1: Add the Knowledge tool
Click on the "+ Tool" button, and then SW Knowledge"
Step 2: Configure the tool
- Assign a meaningful name to the tool. This name will help the model understand the context in which the data will be used.
- Add a description: Provide a thorough description of the database and its use. This information assists the model in contextualizing the data and influences the prompts generated by the system.
- Select your pre created knowledge
Using the SDK
- Assign a meaningful name to the tool. This name will help the model understand the context in which the data will be used.
- Add a description: Provide a thorough description of the database and its use. This information assists the model in contextualizing the data and influences the prompts generated by the system.
- Use your pre created knowledge object to create the knowledge tool
- Add the tool to your application
from superwise_api.models.tool.tool import ToolDef
from superwise_api.models.tool.tool import ToolConfigKnowledge
from superwise_api.models.application.application import AdvancedAgentConfig

knowledge = sw.knowledge.get_by_id(knowledge_id="knowledge_id")

knowledge_tool = ToolDef(name="Name",
                         description="Description",
                         config=ToolConfigKnowledge(knowledge_id=str(knowledge.id),
                                                    knowledge_metadata=knowledge.knowledge_metadata,
                                                    embedding_model=knowledge.embedding_model))

app = sw.application.put(str(app.id),
                         additional_config=AdvancedAgentConfig(tools=[knowledge_tool]),
                         llm_model=llm_model,
                         prompt=None,
                         name="Application name",
                         show_cites = True
                        )
Updated about 1 month ago